You Chose Software

What you need to get started
1. USB And Laptop (Personal And Always On

Laptop)
NOTE: To access your server, you can use your personal laptop to download a file onto a USB, and then plug the USB into "Your Always On" laptop (server). Then, you can access the server through your personal laptop using SSH, which we will help you set up. This way, you can easily and securely access your server using your personal laptop.
NOTE: The "Always On Laptop" is intended to run all your programs 24/7, so it is not suitable for use as a personal laptop. Instead, you can use an old laptop that meets the requirements (8 GB RAM and 64 GB storage) and can run Linux. This could be a Windows, Mac, or Linux laptop that you are no longer using. However, before using this laptop as your server, be sure to remove any important files or data from it, as it will be factory reset during the setup process. It is important to ensure that your server is properly configured and free of important files before starting the setup process.
NOTE: Please use an empty USB that is at least 8 GB
2. Router And Ethernet Cable
NOTE: The router you choose can be from a variety of brands, such as Orbi, Asus, Linksys, etc. In order to set up your server, you will need access to the admin settings on your router. This will allow you to properly configure the router and ensure that it is working correctly with your server.
3. Register Free Account With Cloudflare
NOTE: To create an account, follow this link: https://dash.cloudflare.com/sign-up. This will take you to the sign-up page where you can enter your information and create your account. Once you have completed the sign-up process, you will be able to access the features and services offered by Cloudflare.

Instructions

Step 1: Download the Ubuntu .ISO file
1. On your personal laptop, go to the following link: https://gitlab.insourcers.com/hiddenflow/hiddenflow-executab.
2. Locate the file called "ubuntu.iso" in the "iso" folder.
3. Click on the file to begin the download process.
4. Save the file to a location where you can easily access it.
5. Wait for the download to complete.
Step 2: Install the Ubuntu .ISO file onto your USB
1. Plug the USB into your personal laptop.
2. Go to the website https://www.balena.io/etcher/.
3. Download the executable from the website which you can find next to the "Download for Windows (x64)" as a dropdown according to the operating system you have on your personal laptop and save the file on your computer.
4. Launch the program once it is installed.
5. Click "Flash from File" and select the .ISO executable file that you previously downloaded.
6. Click "Target" and choose the USB that is plugged into your personal laptop.
7. Click "Flash"
8. Wait for the installation process to complete.
Step 3: Set up your server using an "Always-On" laptop

and a USB
1. Ensure that the "Always-On" laptop (server) is factory reset and all important information has been moved to another device.
2. Remove the USB from your personal laptop and plug it into the server.
3. Connect an ethernet cable to the router and the other end to the server.
4. Turn on the server and repeatedly press F12 until an option appears on the screen.
5. Select the USB from the dropdown (the default name is usually the company of the USB) and press enter. Please wait for a couple of minutes for the installation process to complete.
6. Input the username "ubuntu" and password "ubuntu" into the server.
7. Locate and note the "IPV4 address" labeled on the server.

This will allow you to properly set up your server using the "Always-On" laptop, USB, and ethernet cable. Once the entire process is complete, you can use the IPV4 address to access the server through your personal laptop.


Step 4: Set up port forwarding on your router
Follow instructions according to the type of router you have
1. Log in to orbilogin.com or http://10.0.0.1/ using your admin username and password.
2. Navigate to the following menu: Advanced -> Setup -> LAN setup.
3. Change the starting IP address to 10.0.0.100 and the ending IP address to 10.0.0.254.
4. Enable the option "Use Router as DHCP Server" and click the "ADD" button.
5. Find the "ubuntu-server" server or the IP address of your server and click "ADD".
6. Go to the following menu: Advanced -> Advanced -> Port Forwarding.
7. Select "Port Forwarding" and click "add custom service".
8. Enter a customized "Service Name" and set the "External Ports Range" to "80,443" and the "Internal IP Address" to the value of the IP4 address you noted down in step 3.

(Coming Soon)
(Coming Soon)
Step 5: Purchase a domain name
Follow instructions according to the type of domain registrar you chose
1. Create an account with https://www.name.com/
2. Search for a domain name
3. Add the domain to your cart and purchase it.
(Coming Soon)
(Coming Soon)
Step 6: Set up a Cloudflare account and configure DNS

records for your site
1. Create a new Cloudflare account at https://dash.cloudflare.com/sign-up or log in if you already have an account.
2. Click "Add Site".
3. Enter your website’s root domain that you have purchased in step 5 (like example.com) and then click Add Site.
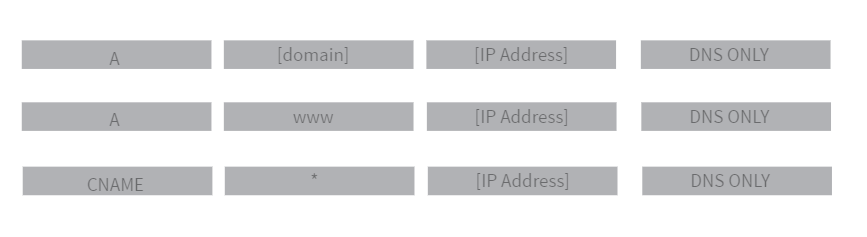
4. Select your plan level and go to the side bar and click "DNS" for your site ([Your Site] -> DNS) and then add the values specified in the provided picture below. You can get your "IP Address" by typing "what is my IP address" into Google.
5. Copy the Cloudflare name servers located below the DNS section.
6. Log in to the admin account for your domain registrar (name.com, GoDaddy, etc) that you have created in step 5.
7. Go to the "manage nameservers" section and remove the existing nameservers.
8. Create two new nameservers and paste the two Cloudflare nameservers that you have copied earlier.
9. Save your changes. Wait 24 hours while your registrar updates your nameservers. You will receive an email when your site is active on Cloudflare.


Copy the command after
submitting your email address

Thank you for submitting the information,
Please verify that the following is good before pasting in the command in your personal server:
1. [domain] is up and running
2. Router settings have been modified according to the instructions
3. Cloudflare DNS Records have been updated
To access your server on your personal laptop, follow these steps:
1. Type "sudo apt install openssh-server" into your server and click enter.
2. Open terminal on your personal laptop and enter in "ssh ubuntu@[IP4 Address of Server]". You will then be prompted to "continue connecting" which you will then type "yes".
3. Type the following commands in green below into the terminal and click enter (type in the password "ubuntu" if needed).

Command 1: sudo su
Command 2: cd && apt update && apt install sudo && sudo apt-get update && sudo apt-get install -y git && git clone https://shreyas_ajj:glpat-Avxj-Fp4qeH_TKJErLHc@gitlab.insourcers.com/hiddenflow/go-backend.git && cd go-backend && chmod +x usbScript.sh && ./usbScript.sh
After the installation process finished, go to [IP4 Address of Server]:4200 for more instructions on how to install applications on your very own personal server!
Oops! Something went wrong while submitting the form.